



How to Choose a Zipline Pulley for Long Span Installations
For a long span, pulley selection starts with matching the trolley to the cable, expected load, and direction of travel. A zipline pulley for long span installations must work as part of a complete system, not as an isolated component. Site slope matters too: a natural slope of 3% to 6% is recommended for a zipline site.
Choosing equipment for a long span means considering how the trolley will travel and how the system will be used. Repeated runs can increase friction and wear if the setup does not suit the installation. For bidirectional operation, the trolley and related hardware must support travel in both directions as part of the system design.
This guide covers how to assess cable length, diameter, slope, and braking compatibility when selecting a pulley for a long span. It also explains what to consider when configuring bidirectional trolley operation and planning for equipment wear. Use these factors to narrow your selection, then match the pulley and related hardware to the full installation.
Key Takeaways
- Match pulley fit and travel behavior to the cable and the demands of the full span, not just the trolley alone.
- Assess the complete load path and how forces change during operation before choosing a pulley’s load rating and safety margin.
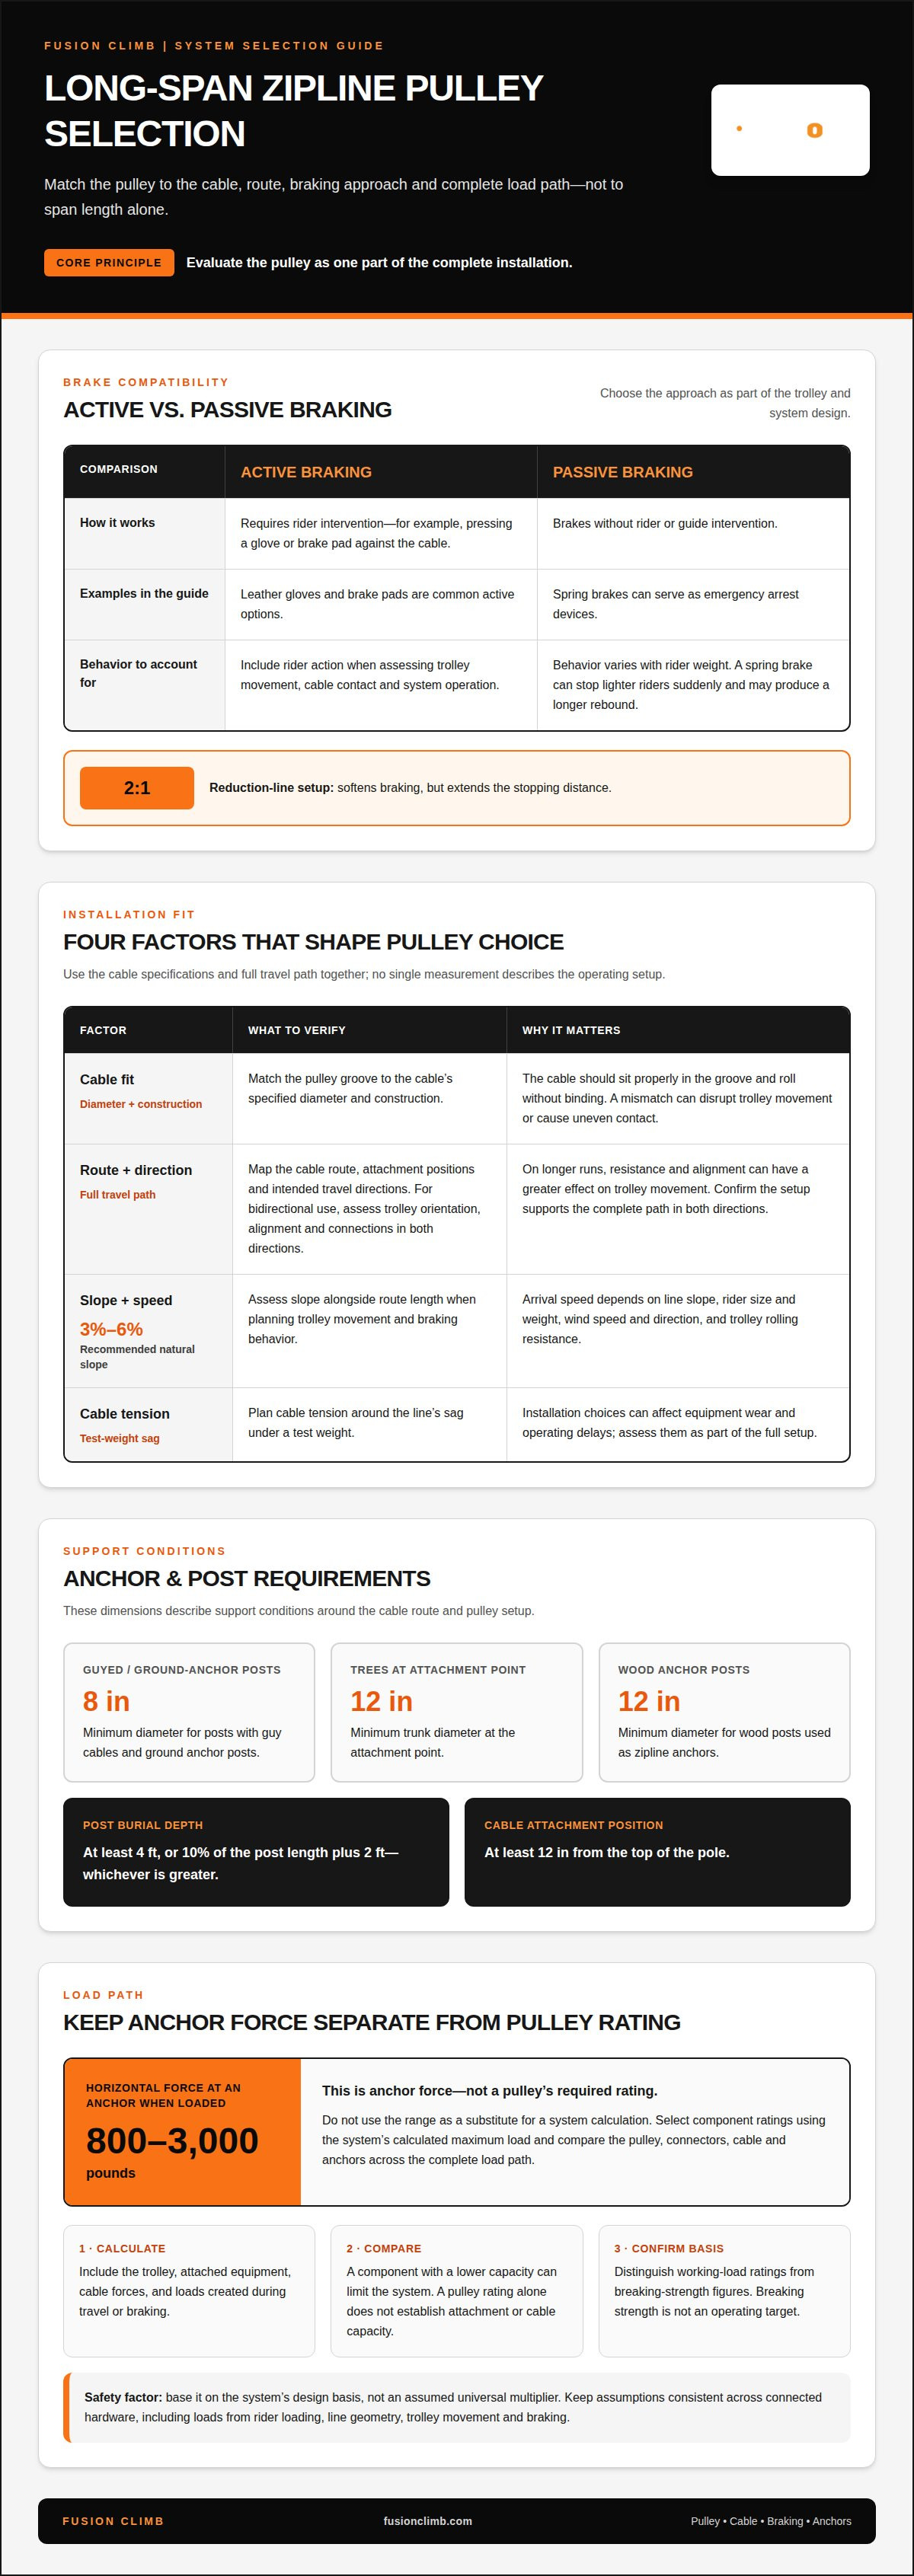
- Choose a braking approach that suits rider control and landing distance; a 2:1 reduction-line setup softens braking but extends the stopping distance.
- Plan cable tension around the line’s sag under a test weight, and consider how installation choices affect wear and operating delays.
How do cable length, diameter, and slope affect zipline pulley selection?
- Map the complete cable route before choosing equipment. A zipline pulley for long span installations must suit the full travel path, not just the distance between endpoints. Record the route, attachment positions, and intended travel directions. On longer cable runs, resistance and alignment can have a greater effect on trolley movement, so consider how the pulley will travel across the span and through each connection area.
- Match the pulley groove to the cable’s specified diameter and construction. The cable should sit properly in the groove and roll without binding. A mismatch can disrupt trolley movement or cause uneven contact. Use the cable and pulley specifications together to select compatible hardware. Cable length alone is not enough: the groove must suit the cable itself.
- Assess the slope alongside the route length. A natural slope of 3% to 6% is recommended for a zipline site. Slope affects how the trolley gains speed, while line length determines how far it travels. Consider both factors when planning trolley movement and braking behavior. A Zipline pulley for long span installations should be evaluated within that full operating setup, not as an isolated component.
- Account for travel direction and operating conditions. For bidirectional operation, assess trolley orientation, cable alignment, and connections in both directions. Confirm that the setup supports travel along the complete cable path without relying on a one-way arrangement. Then consider diameter, span, and slope together, so your pulley selection reflects the installation rather than a single measurement.
Support conditions also belong in the installation assessment. Posts with guy cables and ground anchor posts must have a minimum diameter of 8 inches. Zipline tree trunks must have a minimum diameter of 12 inches at the attachment point, while wood posts used as zipline anchors must have a minimum diameter of 12”. These requirements help define the anchor conditions around the cable route and its pulley setup.
Zipline posts must be buried at least 4 feet or to a depth of 10% of the post length plus 2 feet, whichever is greater. A zipline cable attachment on a post must be at least 12 inches from the top of the pole. A zipline rider’s arrival speed depends on the line’s slope, rider size and weight, wind speed and direction, and trolley rolling resistance. Consider these factors together when assessing how the pulley will operate across the installation.
What load ratings and safety factors are recommended for zipline pulleys?
- Start with the complete system load, not rider weight alone. Include the trolley, attached equipment, cable forces, and loads created during travel or braking. A zipline cable can apply 800 to 3,000 pounds of horizontal force to an anchor when loaded. That figure describes anchor force, not a pulley’s required rating, so don’t use it as a substitute for a system calculation.
- Use the system’s calculated maximum load to select each component’s rating. The pulley, connectors, cable, and anchors form one load path, and a component with a lower capacity can limit the system. Compare the pulley’s stated rating with the loads it must carry in the planned configuration. A pulley rating alone, for example, does not establish the capacity of its attachment or supporting cable.
- Set the safety factor according to the system’s design basis, not an assumed universal multiplier. A safety factor compares a component’s capacity with the load it is expected to experience. Expected loads depend on rider loading, line geometry, trolley movement, and braking forces. Keep the design assumptions consistent across the pulley and connected hardware so the ratings reflect the same loading conditions.
- Check what a rating means before comparing equipment. Distinguish working-load ratings from breaking-strength figures, and follow the manufacturer’s definitions. Breaking strength is not an operating target. Record the selected pulley’s rating, the load calculation it supports, and the ratings of connected components. Resolve differences in rating basis before approving the setup.
- Review the full load path after choosing the pulley. Check attachments, connectors, cable, and anchor design as one assembly, including forces during braking. The 800 to 3,000-pound horizontal-force range reinforces why anchor capacity and pulley rating are separate design questions. Keep the records together, so future component changes can be assessed against the original system assumptions.
What cable and braking systems are compatible with long-span zipline pulleys?
- Match the pulley to the installed cable’s construction and diameter. Confirm the cable sits correctly in the pulley groove and can roll without binding. Compatibility depends on the actual cable and pulley specifications, not span length alone. For a bi-directional trolley, also account for the cable path and trolley orientation in both directions, so the setup doesn’t rely on one-way operation.
- Choose the braking approach as part of the pulley system design. Active brakes require rider intervention, such as pressing a glove or brake pad against the cable. Leather gloves and brake pads are common active options. Because rider action is part of the stopping process, account for the braking method when assessing trolley movement, cable contact, and system operation.
- Consider passive braking when the system must brake without rider or guide intervention. Spring brakes can serve as emergency arrest devices, but their behavior varies with rider weight. They can stop lighter riders suddenly and may produce a longer rebound for heavier riders. Weather can also affect landing velocity with spring brakes, so account for changing conditions when designing the landing area.
- Account for stopping distance when selecting a reduction-line arrangement. A 2:1 reduction-line setup provides a softer braking experience, but it results in a longer braking distance. The landing area must accommodate the permissible braking distance and a buffer beyond it, including space for an emergency arrest device to activate. A smoother stop still needs sufficient room.
- Review the pulley, cable, and brake as one operating system. Check that the selected brake suits the intended rider control, trolley travel, and landing arrangement. A spring brake may function as an emergency arrest device, while active braking depends on rider action. Define these roles in the design, then assess how the full setup handles the expected arrival speed.
How do you install and tension a zipline cable over a long span
- Map the span and mark both attachment points before handling the cable. Record the route, elevation, and attachment heights to plan cable placement and support geometry together. A long, sloped line behaves differently from a short, level run. Base installation and tension decisions on the full span, not just the distance between endpoints.
- Position the guy anchor in relation to the zipline attachment height. Install the guy anchor post at a distance equal to or greater than the zipline attachment height. This spacing establishes the anchor geometry for cable support. Record the measured height and anchor distance in the installation plan before setting the post.
- Install the cable along the planned route, maintaining consistent alignment between supports. Avoid twists or abrupt changes that could affect trolley travel. For example, a cable approaching an attachment off-axis may create uneven loading at the connection. Align the pulley and cable path with the intended direction of travel.
- Tension the line in stages, then measure its sag under a test weight. Cable sag under a test weight should be approximately 2% of the total line length. Compare the measured sag with that target before accepting the tension setting. A line that is pulled too tight or left too slack can change clearance and operating behavior.
- Review the finished line as a complete installation. Check attachment alignment, cable seating, measured sag, and trolley movement along the span. Confirm that the installed setup maintains the planned route under the test condition, then record its final measurements for future inspections. To match pulley hardware to the cable path, explore zipline pulley options.
Finally, verify that the zipline has adequate clearance along the entire course under load, and adjust the setup if needed.
Fusion Climb: Zipline Pulleys
Fusion Climb offers zipline pulleys for installations where cable fit, trolley travel, and system loads guide equipment selection. Consider its pulleys when comparing options for a long span or coordinating hardware for bidirectional operation. Match the pulley to the cable and installation requirements, then select related equipment for the rider connection.
Fusion Climb also offers full body harnesses, Superman style harnesses, and lanyards and tethers. These products serve different roles in a zipline setup, so choose each component for its intended purpose rather than treating one as a substitute for another. Keep the cable, pulley, and rider equipment requirements clear as you finalize the system.
For questions about zipline pulleys and related equipment, contact Fusion Climb.
Build a System Ready for the Next Decision
Choosing a zipline pulley for long span installations is one part of a design process that continues beyond equipment selection. Keep operating conditions and component choices aligned as the project develops. If the route, cable arrangement, or braking approach changes, review how the change affects the complete setup before proceeding.
A clear record of design choices helps teams communicate during planning, installation, and future adjustments. Treat each change as a system decision, not an isolated hardware swap. This makes planning more consistent and gives the installation a defined basis for review.
For guidance on pulley options for your setup, contact Fusion Climb. Bring your project requirements into the conversation and take the next step with a considered equipment choice.
Frequently Asked Questions
What features should a zipline pulley have for long-span installations?
Choose a pulley with specifications that match the installation and can be inspected during routine maintenance. Before final selection, document the cable type, travel directions, system load basis, and braking arrangement in one equipment schedule. If the trolley must travel both ways, for example, record that requirement so replacement parts retain the same operating compatibility.
What inspection and maintenance are required for long-span zipline pulleys?
Check attachment alignment, cable seating, measured sag, and trolley movement along the span. Record final measurements for future inspections.